How To Arrange Furniture Around A Bay Window Without Blocking Access
A practical step-by-step guide to how to arrange furniture around a bay window without blocking access, including preparation, instructions, common issues, tips, and next steps.
How To Arrange Furniture Around A Bay Window Without Blocking Access
Arranging furniture around a bay window without blocking access is a practical design challenge that balances light, traffic flow, and comfort. This guide helps you plan a layout that keeps pathways clear, uses the window as a focal point, and avoids crowding the space. You will learn to measure, test placements, and select pieces that fit your daily routines.
Fast Answer
- Start by measuring the bay window area and the main walkways, then sketch a floor plan to test furniture placements before moving anything.
- Keep at least a clear path to the window and avoid blocking heating vents or access to adjoining rooms.
Before You Start
- Measure the full bay window area, including the depth of each side and the total width, and note any fixed elements like radiators or vents.
- Identify the main traffic routes through the room, such as paths from doors to other rooms or to the kitchen, and mark them on a sketch.
- Decide how you want to use the bay window space: as a reading nook, a dining area, a plant display, or simply a light source.
- Gather a tape measure, painter's tape, and paper to create a scale floor plan; this helps you test layouts without moving heavy furniture.
Step-by-Step Instructions
Measure the bay window and the room
Begin by measuring the bay window thoroughly. Record the total width across the front, the depth from the front glass to the wall opening, and the width of each side section. Also measure the height from the floor to the window sill and to the top of the window frame. Next, measure the room's overall dimensions and the locations of doors, closets, and other fixed features. Use painter's tape to mark these measurements on the floor, creating a to-scale outline of the bay window and the main walkways. This visual guide helps you see how much space you truly have and prevents you from buying or moving furniture that will not fit. A practical check is to walk through the taped area to confirm that your normal path remains at least 36 inches wide. This step matters because accurate measurements are the foundation of any successful layout, and guessing often leads to blocked access or cramped feelings.
Map your daily traffic patterns
Spend a day observing how you and others move through the room. Note the paths you take from doorways to other rooms, to the kitchen, or to the bay window itself. Pay attention to where you pause, such as near a light switch or a favorite chair. Use painter's tape to mark these routes on the floor, especially any path that leads directly to or past the bay window. The goal is to keep these routes clear of furniture. A practical check is to walk the taped paths while carrying a laundry basket or a tray to simulate real use. If you have to sidestep or turn sideways, the path is too narrow. This step matters because furniture that blocks a main walkway quickly becomes annoying and can even be unsafe, especially in emergencies. By identifying traffic patterns first, you can place furniture that supports your routines rather than fights them.
Choose the right furniture scale
Select furniture that fits the scale of your bay window and room. A common mistake is placing a large sofa or cabinet that overwhelms the space. Instead, measure the depth of the bay window and look for pieces that are no deeper than the window's recess, so they do not protrude into the main walkway. For a reading nook, a small armchair or a window seat with storage can work well. For a dining area, consider a round table that allows people to slide in and out easily. A practical check is to cut out paper templates of your furniture using the same scale as your floor plan and move them around the taped area. This shows you exactly how much room each piece takes up and whether you can still access the window to open it or clean it. This step matters because proper scale ensures both comfort and function, and it prevents the bay window from becoming a dead space.
Position the main anchor piece
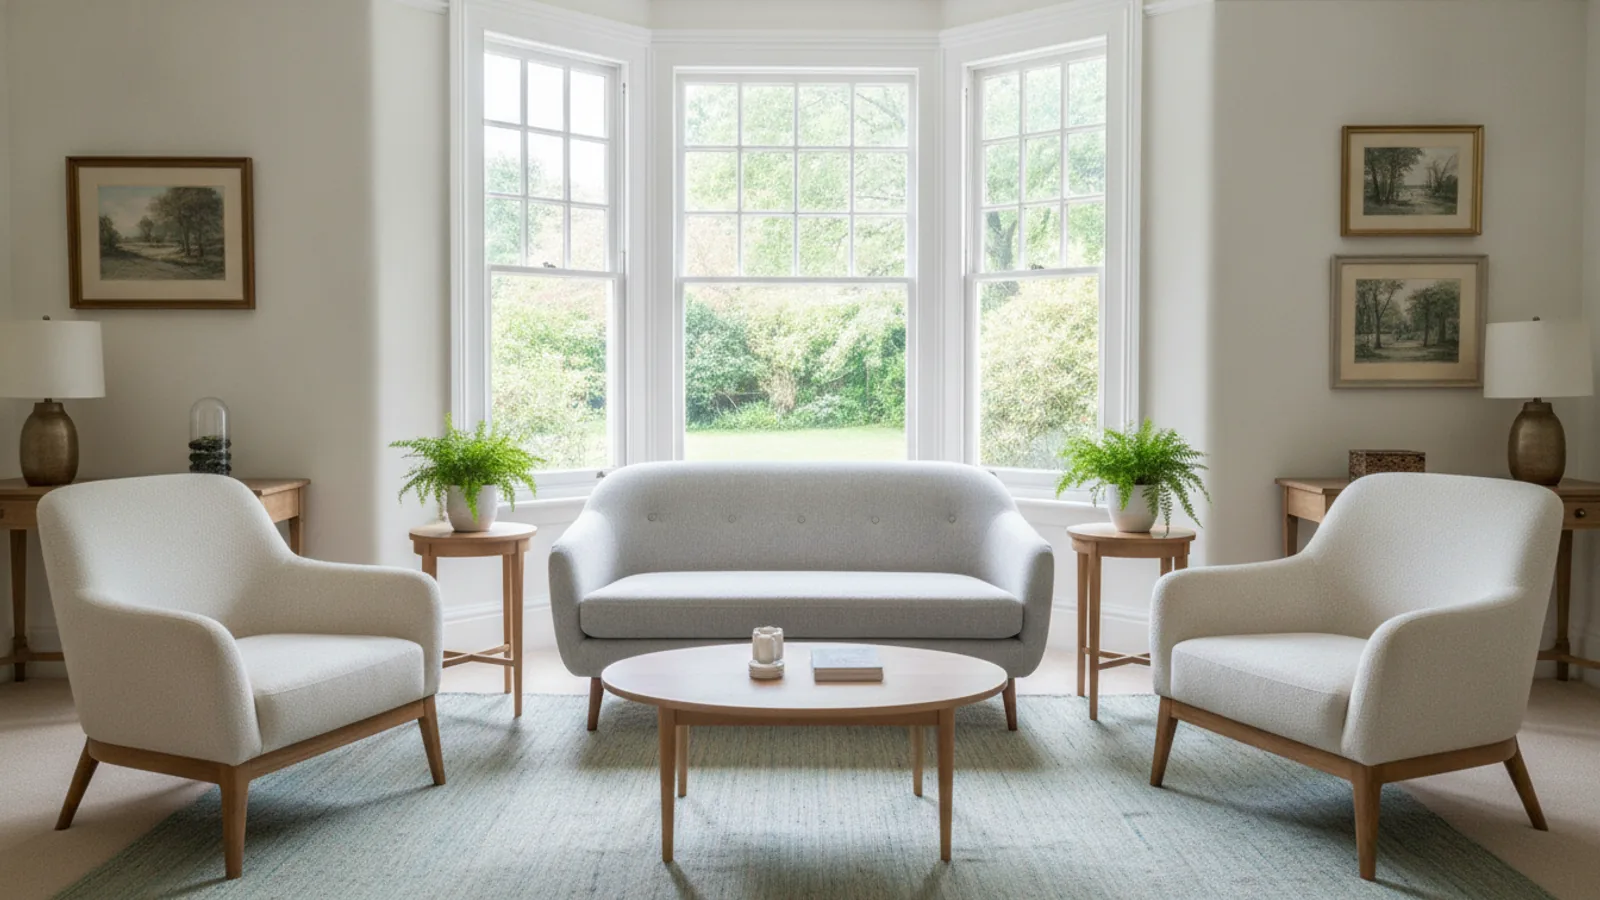
Decide on the primary piece of furniture for the bay window area, such as a sofa, a dining table, or a desk. Place it so that it faces into the room or at a slight angle, allowing you to enjoy the window without blocking the view or access. If you choose a sofa, pull it forward slightly from the wall to create a walkway behind it if needed, but avoid blocking the window's lower sections. A practical check is to sit in the piece and see if you can comfortably look out the window and if you can easily get up without bumping into anything. Also, check that the piece does not cover any vents or radiators. This step matters because the anchor piece sets the tone for the entire arrangement, and placing it correctly ensures that the bay window remains a feature rather than an obstacle. It also helps define the purpose of the space.
Add secondary pieces with clearance in mind
Once the anchor piece is set, add secondary furniture like side tables, floor lamps, or additional chairs. Keep at least 18 inches of clearance around each piece to allow people to move comfortably. In the bay window area, avoid placing tall items that block light or the view. Instead, use low-profile pieces such as a small side table or a plant stand. For a seating arrangement, angle chairs slightly toward each other to encourage conversation while still allowing access to the window. A practical check is to stand at the window and ensure you can reach the window latch or handle without moving furniture. Also, verify that you can walk from the main room into the bay area without turning sideways. This step matters because secondary pieces can easily clutter a small space, and maintaining clearances keeps the area functional and inviting. It also prevents the bay window from feeling like a separate, unused zone.
Test and refine the layout
With all furniture in place, live with the arrangement for a few days. Notice if any walkway feels tight or if you frequently have to move something to open the window or access a cabinet. Use painter's tape to mark any spots that feel problematic, then adjust furniture positions slightly. For example, you might pull a chair a few inches away from the window or swap a side table for a smaller one. A practical check is to ask someone else to walk through the space and give feedback; a fresh perspective often catches issues you have overlooked. Also, check that all doors and drawers can open fully. This step matters because small adjustments can make a big difference in how well the space works. It also ensures that the final layout supports your daily activities without frustration, and that the bay window remains an asset rather than a barrier.
Quick Reference
| Situation | Action | Why it helps |
|---|---|---|
| You want a reading nook in the bay window but the space is narrow. | Place a single armchair angled toward the room, with a small side table on one side and a floor lamp behind it, leaving at least 36 inches of clear space in front of the window to walk through. | This keeps the walkway open while creating a cozy spot, and the angle allows you to see both the window and the room without feeling closed in. |
| The bay window is in a dining area and you need to fit a table. | Use a round or oval table positioned so that the window is at one end, and choose chairs without arms so they can tuck under easily; ensure there is at least 24 inches of clearance from the table edge to any wall or furniture. | Round tables allow people to slide in and out without sharp corners blocking movement, and proper clearance prevents chairs from hitting the window or walls when pulled out. |
| You have a radiator or vent under the bay window and want to place furniture there. | Avoid placing upholstered furniture directly in front of the radiator; instead, use a slim console table or a bench with an open frame that allows air to circulate, and keep at least 12 inches of space between the furniture and the heat source. | Blocking heat sources can reduce efficiency and create fire hazards, while open designs allow warm air to rise and circulate without obstruction. |
Common Issues
- Furniture blocks the path to another room, forcing people to squeeze past.: Rearrange the layout to create a clear path at least 36 inches wide. Move the largest piece to a different wall or angle it, and replace bulky items with slimmer alternatives. Use painter's tape to mark the new path and test it by walking through with a laundry basket.
- The bay window feels dark because tall furniture blocks the light.: Lower the height of furniture near the window. Swap tall bookcases for low shelves or benches, and choose chairs with open backs. Keep window treatments pulled back during the day. A practical check is to stand in the room and see if natural light reaches the back wall; if not, reduce the height or density of items in the bay.
- You cannot open the window or reach the latch because furniture is in the way.: Leave at least 24 inches of clear space in front of the window's operable sections. If space is tight, use furniture on casters so you can roll it aside when needed. Alternatively, place only low items like a window seat or plant stand that do not interfere with the window's operation. Check that you can fully open the window without moving anything.
Advanced Tips
- Consider using a curved or angled sofa to follow the shape of the bay window, which can maximize seating while keeping the walkway clear and looking intentional.
- If the bay window has a deep sill, add a custom cushion to create a window seat that doubles as storage; this uses the space without blocking access and provides extra seating.
- Use a large mirror on an adjacent wall to reflect light from the bay window and make the room feel larger, but avoid placing it where it would reflect a cluttered area.
Final Checklist
- Walk through the room and confirm that all main paths, especially to the bay window, are at least 36 inches wide and free of obstacles.
- Check that you can fully open and close the bay window, reach its latch, and access any vents or radiators without moving furniture.
- Ensure that all furniture is stable and does not wobble, and that cords from lamps or devices are safely tucked away and not pinched.
- Sit in the space at different times of day to confirm that the layout feels comfortable and that natural light is not blocked by tall pieces.
FAQ
Can I place a sofa directly in front of a bay window?
You can, but it often blocks light and access. If you do, leave at least 18 inches between the sofa back and the window so you can open it and clean. Better yet, angle the sofa or pull it forward to create a walkway behind. Always check that you can reach the window latch without climbing over furniture. This keeps the window functional and the room feeling open.
How do I arrange furniture in a small bay window area?
In small spaces, use multi-functional pieces like a bench with storage or a small round table. Keep furniture low to preserve light and views. Place the largest piece along a solid wall, not in the bay itself, and use the bay for a chair, plant, or window seat. Maintain clear paths of at least 36 inches. Test with tape on the floor before moving heavy items. This approach keeps the area usable without feeling cramped.
What should I do if the bay window has a radiator underneath?
Avoid placing upholstered furniture directly over or in front of the radiator, as it can block heat and create a fire risk. Instead, use a slim console table, a metal bench, or a plant stand that allows air to circulate. Keep at least 12 inches of clearance. If you must place a chair there, choose one with an open frame and move it away when the heat is on. Always check your radiator's manufacturer guidelines for safe clearances.